

Pokemon Subway Project
Within my second year at my VFX HND course. I was tasked with creating a character design, modelling, texturing, rigging and animating a Pokemon of our choice in which I choose Cubone to be composited into a subway scene.
Software used:


Research and Inspiration


In my second year at my HND Lvl5 in Visual Effects we were tasked with creating a realistic yet cartoonish pokemon from a selected list and implimenting them into a subway scene. To start I did my research into the pokemon, finding most inspiration from the film Detective Pikatchu.
I moved on to create a pureref board with both cartoon cubone and 3D models from other professional artists, as well as textures for it and similar real life animal anatomy I would drive inspiration from.


Modelling/Sculpting
Previs Adv
To begin my process I started with blocking out a base sculpt using pure ref I gathered references of cubone both 3D and 2D to build its face and body. Using Zbrush I used zremesh and created the base for my previs.
From this I was able to create a body good enough for a rig and previs.
Once my previs was done I started on my advanced sculpt where I took the base model and devloped my muscle groups and looked at real life animals and how their eyes sat for preditors, refining the head to look more realistic with it's porportions. Furthermore, adding layers and alpha brushes I created the cracks in the skull and the bumps of the scales


UV Mapping
Previs Adv
Once my previs base sculpt was done I moved onto creating a UV map for it to apply textures, I use the cut and sew tool to create and layout each part.

For my advanced sculpt I used a low res version to cut and sew my UVs and lay them out with each side on one row. I also had to remesh my skull as it was challenging to cut out around the eyes without it.
Texturing
Previs Adv
After setting up my UVs I went into substance painter and imported my model. Here I put some basic textures for the model on using smart materials and painted any details on such as teeth and tongue and claws.
Then I exported them and brought them back into Maya using hypershade editor and connected them to each material.
For my advanced model after settiing up uvs I imported the model into the substance painter scene and used smart materials for the base, painting details on the claws and spikes and inside of the mouth. Because of the way I made a material in Maya for the teeth, tongue, skull and body It made it easier to work with. Then I exported them and brought them back into Maya using hypershade editor and connected them to each material and adding an ainormalmap for my normals.


Rigging
Previs Adv
Once textures were applied I started on making the rig, using Mgear plugin I was able to use the guide to build a basic rig for the body and added a spine ik for the tail controls, creating a master rig for the animation. After which I weight painted the geom to the controllers.
Using the guide for my previs rig I created new controllers, resized them and used a chain Ik instead of spine for the tail for easier animating. After that I weight painted the rig so when a controller is used the right part of the geom moves with it.
Previs and Animation
After my base model was rigged and weight painted I moved onto creating a previs environment to animate it. Using Unreal Engine 5 and its assets I made a subway as close as possible to the master scene I would end up compositing my model into. Once It was ready I took the unreal scene and placed it into Maya where animated a basic movement of Cubone jumping out of the train onto the platform. Once animated, I brought cubone back into Unreal, setup lighting, animated the train and cameras. I created a sequence where I animated the train doors opening an then my previs was ready.

Camera track, setup and lighting
With the previs done, I was able to to take the master sequence into Nuke, here I created a camera track node tree using a point cloud, creating planes for the platforms and the pillars in the subway scene. After this I exported the track into Maya, using an image plane sequence I was able to create a scene ready for animating with a background of the master sequence.
For my lighting I created a basic cube geom/plane geom and stretched it for the train and blocked out where I wanted the lighting and shadows to bounce of. After that I added a Subway HDRI Aiskydome to the scene and scale it up, changing samples, exposure and intensity to light up the scene.

Adv Animation
With the environment setup, I was ready to animate. I used reference editor to bring in my adv master rig and with the image plane behind and reference animation from the detective pikatchu film I started to animate the model jumping of the train. Beginning with a walk cycle I blocked in the key movements and then refined it further with smaller movements.
Render Passes
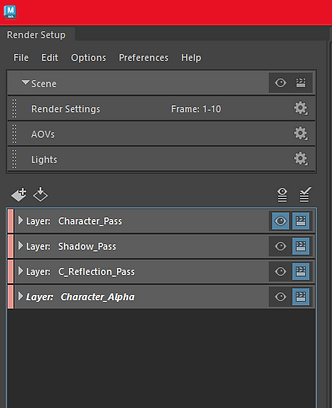
Once animation was done, I was ready to bring it into Nuke for final compositing. To do this I started to create render passes. I created a pass for the character model, it's shadows, reflection and alpha.
Using absolute overrides and material overrides I rendered them layer by layer as an exr format for placing into Nuke.


Rotoscoping/Compositing


After rendering each pass I created my nuke tree next to my camera track. I created a card for each pass and imported my background, character pass, reflection, alpha and shadows. Furthermore, I created a vector blur for the character and ZDepth to make it blend in more.
After this, I was able to start to rotoscope and used merge nodes to roto the character, shadows and reflection of the door and where the train started.
Lastly, I colour graded the scene, adding noise, shadows, brightening up the scene and making my character look apart of the scene more. Then I was able to make my final render and edit using After effects of my composited scene into the full master sequence.
